Picture this. You stand in your garage with a 2×4. You need a quick crosscut. But the tape measure slips. Your pencil line goes crooked. Frustration builds fast.
The speed square fixes that. This small triangular tool hooks onto wood edges. It marks straight 90-degree lines in seconds. No fumbling. No waste.
You get a one-tool method here. It suits beginners and pros. Follow these steps. Save time on every cut.
Why the Speed Square Wins for Lightning-Fast Crosscuts
Speed squares shine for crosscuts. They beat bulky tools every time. You mark perpendicular lines on lumber or plywood fast. Pros use them on framing jobs. You can too.
Take a deck build. You cut dozens of 2x6s. A speed square saves minutes per board. Errors drop. Lumber lasts longer. Portability helps. It fits in your pocket. Durability holds up on rough sites.
In addition, it reduces measuring mistakes. Tape pulls often twist. Squares need two hands. But the speed square works solo. Results stay accurate.
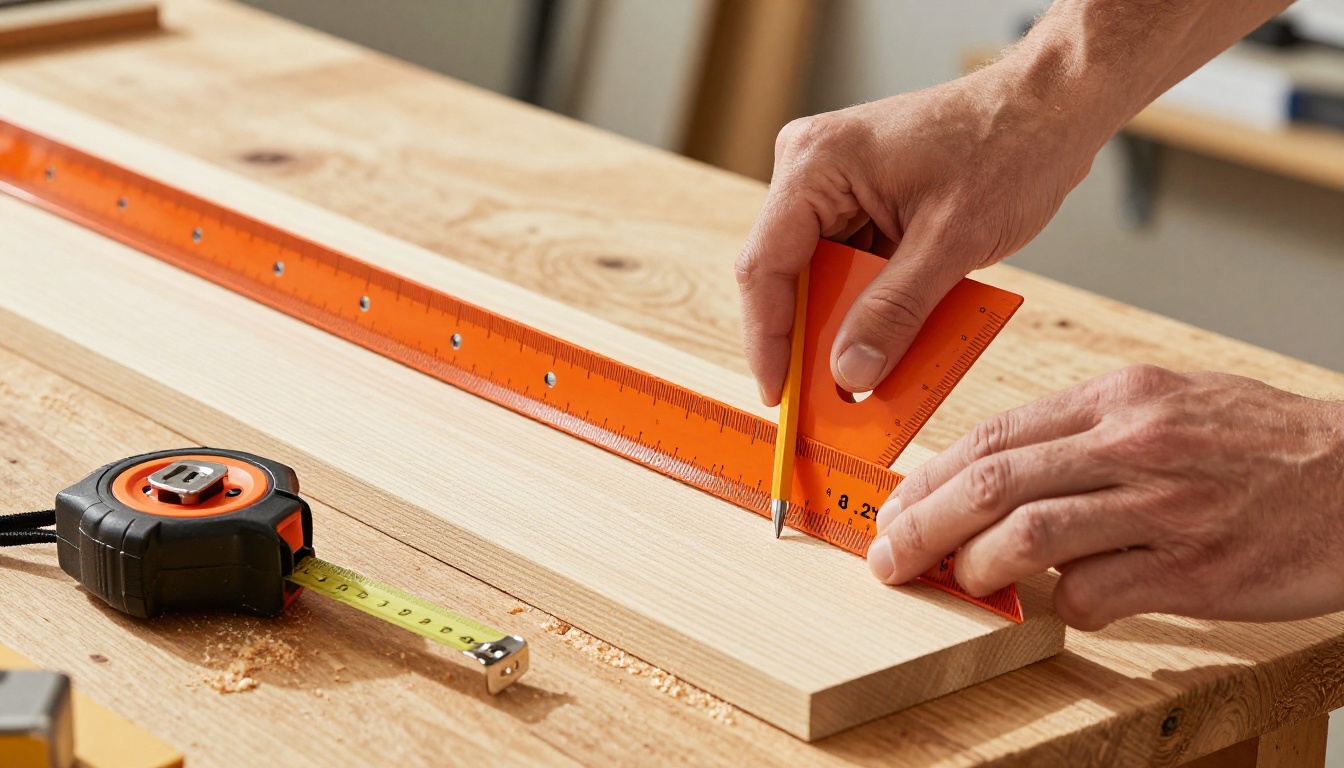
Spot the Features That Make Marking a Breeze
Look close at the speed square. The lip along one edge hooks the board end. It stays put without clamps.
The 90-degree corner aligns perfect. Degree markings run along the hypotenuse. Pencil notches sit at key spots. Slots cut for common angles like 45 degrees.
For crosscuts, slide the lip over the wood edge. Pivot to the 90 mark. You mark solo. No helper needed. These parts make lines razor straight.

{Image intent: Illustrate key features of speed square for crosscut marking}
Common slots help too. They guide pencils for thick lines. You see the mark clear. Saws follow easy.
How It Beats Other Tools Hands Down
Tape measures slip on ends. You chase straight lines. Framing squares weigh more. They need flat tables.
The speed square fits one hand. You operate fast. It costs less. Pocket size beats tool belts full.
Pros pick it for repetitive cuts. Framing crews mark joists quick. For more on tool comparisons, check Swanson’s speed square basics.
Accuracy wins. Crosscuts stay square. Jobs finish on time.
Nail Perfect Crosscuts in Three Easy Steps
Master crosscuts with three steps. Use safety glasses first. Clamp boards if possible. Work on stable surfaces.
This method works on 2x4s or plywood. Practice on scrap. You build confidence fast.
-
Hook the lip and square up. Place the lip flush on the board end. Face the numbers away. Pivot the tool to the 90-degree line. Press firm with thumb. Hold the board long side down. It stays stable.
Check squareness first. Test on a known straight edge. Adjust if needed.
-
Scribe a razor-sharp line. Drag a pencil along the edge. Use notches for thick marks. Press medium. Sharp pencils work best.
Thick lines account for saw kerf. Mark both faces. You verify square from all sides.
-
Saw smoothly along your mark. Set the saw base on the line. Start slow. Let teeth bite. Plunge straight.
Clamp for safety on narrow stock. After cut, measure ends. Check 90 degrees with the square again.
These steps cut time. Freehand marks wander. This stays true.

{Image intent: Demonstrate the three-step crosscut process visually}
For visual demos, see Empire’s speed square guide.
Steer Clear of Traps and Unlock Pro Shortcuts
Newbies make wobbly marks. Warped boards cause it. Loose grips worsen things. But fixes exist.
Ever cut off-line? Brace better. You speed up with practice.
Batch cuts save hours. Stack boards. Mark multiples at once.
Fix Wobbly Marks from Poor Grip
Warped ends shift the lip. Boards bow under pressure.
Knee-brace the stock. Use scrap blocks for flat bases. Mark from both ends on long pieces. Lines match perfect.
Grip tight near the pivot. Thumb locks it down. Practice on flats first.
Speed Boosts for Repetitive Cuts
Stack plywood sheets. Run the square across tops. Notch scribes guide pencils even.
Combine with circular saw bases. Align factory edges. Quick 45-degree crosscuts pivot easy to markings.
Wear gloves. Angles change blade paths. Stay alert.
Pro carpenters batch 20 cuts in minutes. You match them soon.

{Image intent: Show pro shortcuts like batch marking for efficiency}
When to Pair It with Other Tools
Speed squares enhance kits. Stop blocks repeat lengths exact. Levels double-check flats.
Don’t ditch tapes. Use them for distances. Squares shine for angles.
Add a sharp saw blade. Cuts clean faster. For tool pairings, read Wood Magazine’s framing tips.
Master combos. Your work levels up.
You now mark crosscuts fast and true. Speed squares cut waste and time. Grab yours. Test on scrap wood today.
Share your first perfect cut in comments. What project next? Subscribe for more shop hacks.
Turn measuring marathons into quick wins. Build better. Cut smarter.
(Word count: 1487)