Imagine you pour hours into a woodworking project, like that perfect picture frame or cabinet door. You step back, proud of the build, but those rough, splintery edges stare back at you. They ruin the whole finish and make your work look amateur.
Enter the block plane, your best friend for silky smooth edges. This compact tool, about 6-7 inches long, fits right in your hand. It excels at detail work on edges and end grain, no power tools required. You get ultra-smooth surfaces that reduce tearout in tricky woods like cherry or maple. Plus, it delivers pro-level results in minutes, whether you’re a hobbyist fixing up furniture or a trim carpenter on the job.
Block planes suit everyone from weekend warriors to full-time pros. They handle everything from smoothing chamfers to fitting joints tight. But success depends on setup and technique. Many folks struggle because they skip proper adjustment, leading to chatter or uneven cuts.
In this guide, you’ll learn to set a block plane right, from blade sharpening to mouth adjustment. Next, master use block plane for smooth edges techniques that work every time. We’ll cover common pitfalls to avoid, plus care tips to keep it sharp and ready.
Ready to master your block plane? Grab your tools, and let’s dive into the parts first. Follow these steps, and you’ll get flawless edges on every project.
Get to Know the Essential Parts of Your Block Plane
You hold a block plane in your hand, but do you know what makes it tick? Start here. These parts team up to deliver those smooth edges you crave. Get familiar with them now, and setup feels simple.
The body forms the base. Cast iron or lightweight alloy keeps it stable. You press it flat against wood without wobble. That firmness matters for clean passes on edges.
Inside sits the blade. This thin, sharp iron or steel cuts the wood. It mounts bevel-up, often at a low 12- to 20-degree bed angle. End grain yields easier this way. A straight, honed edge shears fibers neatly.
The lever cap locks the blade down. Twist its cam lever, and it clamps firm. No slip during cuts.
Turn the depth adjustment knob at the front. It raises or lowers the blade projection. Small tweaks control cut depth.
Nudge the lateral adjuster lever side to side. This squares the blade perfectly even.
Finally, the adjustable mouth plate sets the opening ahead of the blade. Close it tight for finishing; open wider for rough stock removal.
Each part plays a role in smooth results. Tighten the mouth, and tearout drops. Align the blade straight, and shavings curl uniform. Low-angle block planes excel here, especially on tricky figured woods like curly maple. They reduce resistance for silkier surfaces.
Check your model’s manual first. Brands like Lie-Nielsen block plane overview or Stanley tweak details slightly.
Knowing these parts makes setup a breeze. You avoid guesswork. Now, let’s zoom in on key ones.
Blade and Its Role in Clean Cuts
The blade does the heavy lifting. Choose high-carbon steel for quick sharpening and polish. Or pick A2 steel; it holds an edge longer against abrasion.
Hone it to a 25-degree bevel on that 12-degree bed. Why? The combo creates a low effective angle. It rocks for smooth edges, slicing thin without digging in. End grain stays tear-free.
Spot dullness fast. Burnished wood appears shiny but smooth. No shavings form; just powder. Or cuts chatter.
Sharpen first, always. A fresh edge transforms your plane. Dull blades frustrate everyone.
Picture this: the blade protrudes just right, bevel gleaming. It takes gossamer shavings, leaving glass-like wood behind.
 *Block plane blade in position, illustrating low-angle setup for end grain.*Adjustment Mechanisms Explained
Master these, and your plane sings. Start with the depth wheel. Turn clockwise to retract the blade. Go counterclockwise for more bite. Fine turns yield paper-thin shavings, perfect for smoothing.
Next, the lateral lever. Nudge left or right. This tilts the blade for squareness. Check with a straightedge across the sole. Even projection prevents skewed cuts.
Adjust the mouth last. Slide the plate forward to narrow it. Use this for finish passes; it supports the wood right at the cut. Wide mouths suit heavy removal, but close them for edges.
Fine settings create gossamer shavings. They curl like ribbon, signaling silky results. Coarse ones rip and tear.
Practice on scrap. Dial in small changes. Your edges turn pro-level smooth.
In short, these mechanisms let you tailor the plane. Match them to the wood, and tearout vanishes.
Step-by-Step Setup for Razor-Sharp Performance
Grab your block plane, and let’s set it up right. This process turns a good tool into a precision machine. You start with a new or refurbished plane, so assume it needs full attention. First, wear eye protection always. Clamp scrap wood secure to your bench. Follow these steps, and your plane glides like butter over edges.
Begin by flattening the sole if it rocks on flat glass. Tape 120-grit sandpaper to float glass or granite. Rub the sole in figure-8 patterns for 10 minutes. Check flatness with a straightedge under light. Gaps mean more rubbing. A flat sole ensures even cuts, no waves on your edges.
Next, sharpen the blade. Install it bevel-up later. For now, remove and hone it razor-sharp.
Sharpening the Blade Like a Pro
A sharp blade slices clean shavings. It leaves smooth edges without sanding. Dull ones tear wood and chatter. So, master this routine. You can go freehand on stones or use a jig for ease. Jigs hold consistent angles; freehand builds skill fast.
Start with the blade back. Lay it flat on 1000-grit waterstone. Push strokes only, 10 passes. Check for flat shine across the back. Flats prevent rocking and weak edges.
Now, primary bevel. Most block planes bed at 12 degrees. Hone the bevel at 25 degrees total. Freehand? Rock the blade lightly. Or clamp in a jig set to 25 degrees. Do 20 strokes on 1000-grit, then 6000-grit for polish. Alternate sides to keep burr free.
Add a micro-bevel for speed. Raise to 27 degrees on fine stone. Just 10 strokes each side. This strengthens the edge.
Finish with a strop. Leather charged with green chromium oxide compound works best. Pull the blade bevel-down, 20 times per side. Edge gleams like a mirror now.
Why bother? Sharp blades shear end grain perfect. You get glass-smooth edges on cherry or oak. No tearout, less work.
Test sharpness. Shave arm hair clean, no tug. Or plane scrap; shavings curl continuous.
 *Blade honing on waterstone for flat back and bevel.*For details on stones, check this waterstone sharpening guide from Fine Woodworking.
Fine-Tuning Depth, Alignment, and Mouth
Blade sharp? Install it now. Slide bevel-up into the body. Secure lever cap finger-tight first. Too tight binds adjustments.
Set lateral alignment next. Sight down the sole. Blade edge must run parallel to sides. Nudge the lateral lever left or right. Hold plane to light; no gaps along blade edge. Straight blade cuts full width even.
Adjust depth. Turn knob counterclockwise slow. Project blade a hair, about 0.001 inch. Test on scrap. Aim for paper-thin, curly shavings across full width. No digging in. Retract if it stalls; advance for bite.
Narrow the mouth last. Slide plate to 1/16 inch opening. Use a feeler gauge or dime edge for check. Tight mouth supports wood close to cut. It kills tearout on smooth passes. Open wider for roughing heavy stock first, then close for finish.
Visual checks save time. Hold plane to light after each tweak. Gaps mean misalignment. Test cuts reveal issues. Chatter? Back off depth or tighten lever cap. Tearout? Close mouth more or re-sharpen.
Pro tip: Set coarse for initial roughing on edges. Switch fine for final smoothing. Practice sequence avoids frustration.
Here’s the adjustment order:
- Align laterally with light check.
- Set depth for light shavings.
- Tune mouth snug.
Your plane hums now. Run it over scrap edge. Full shavings mean success. Smooth results follow.
 *Plane tuned with paper-thin shaving projection.*Troubleshoot quick. Stalling? Advance blade tiny bit. Skewed cuts? Re-check lateral. Follow this, and edges turn flawless every time.
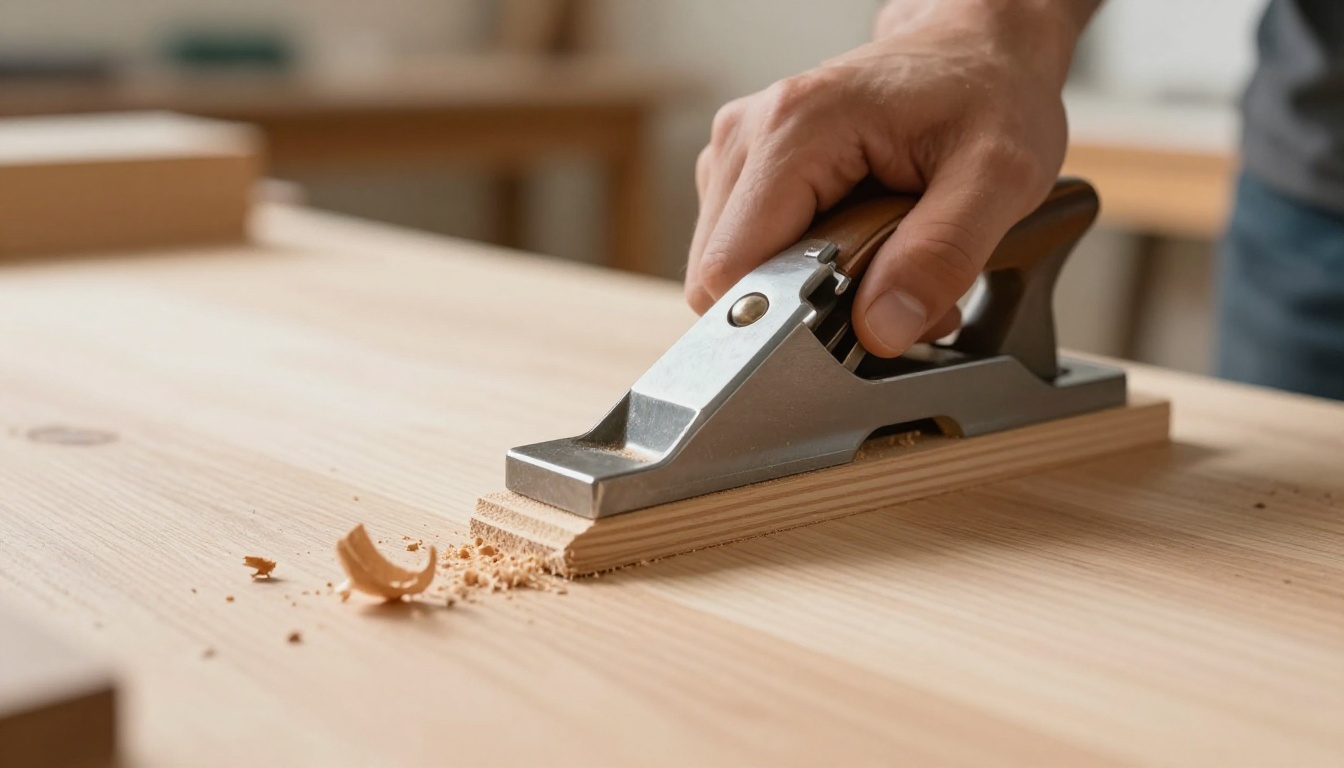
Master the Right Technique for Glass-Smooth Edges
Your block plane hums after setup. Now put it to work on edges. Clamp the board tight to your bench. This stops slips and wobbles. Plane with the grain direction. Skew the plane at 30 degrees if grain flips. Apply light downward pressure on the toe. Push strokes shine for most jobs. Relax your body. Keep the plane sole flat to the edge.
Start rough, then finish fine. Widen shaving width bit by bit. Straight edges plane easy. Curved ones need short strokes. Follow the curve closely. No loose clothes near the blade. They catch and pull you in. Results? Edges smooth enough for finish. Skip sanding altogether.
Practice on pine scraps first. Pine cuts forgiving. Hardwoods like maple resist more. Take lighter passes there. Softer woods like poplar plane quick. Adjust depth shallower for them.
 *Correct hand grip for steady control.*Perfecting Your Grip and Stroke
Thumb presses the lever cap top. Fingers curl under the body for support. This setup locks your hold firm. You guide the plane without white-knuckling it.
Push forward for straight edges. It feels natural. Pull strokes suit some folks, especially lefties. Control speed either way. Go slow at first. Rushing causes digs and tearout.
Read the grain before you start. Tilt the board to light. Grain direction shines back. Plane downhill always. Reversing grain? Skew 30 degrees across. This shears fibers clean. In addition, keep strokes even length. Overlap them slight for uniform smooth.
Test on scrap. Shavings curl full width? You’re golden. Choppy bits mean adjust angle or speed. Practice builds muscle memory fast.
Handling End Grain and Tricky Edges
End grain laughs at big planes. Block planes win here because they stay light and nimble. Larger bench planes bog down and chatter.
Light climb cuts work first. Plane against grain shallow. One pass max. Then switch to back-planing. Push across the end slow. Multiple light passes beat heavy ones. Tearout drops way down.
Chamfer corners first if needed. Take a 45-degree bevel light. This breaks sharp edges. Clean corners follow easy. For tricky spots like knots, skew more. Or plane from both sides in.
Block planes beat others on tight spaces. You reach drawer edges or moldings no problem. End grain planing tips from Popular Woodworking show why pros pick them.
Curve edges? Short overlapping strokes hug the shape. Straight ones take full length passes. Hardwoods need extra light depth. Softwoods forgive wider shavings.
Safety stays simple. Tuck sleeves. Stand clear of the path. Your edges turn glass-smooth quick. No sanding mess after.
Dodge These Pitfalls and Pro Tips for Flawless Finishes
You set up your block plane perfectly, but one slip ruins the edge. It happens to everyone at first. Dull blades tear wood. Wide mouths invite splinters. Misaligned irons cut uneven. Forcing heavy passes causes chatter marks. Skip these mistakes, and you save hours on every project. Instead, grab these fixes and tips for pro results every time.
Common errors pop up fast. A dull blade powders wood instead of shaving it. Sharpen often, as we covered. Check it before each session. An open mouth lets shavings escape wrong. It causes tearout, especially on figured grain. Close it to 1/16 inch for finishes. Misaligned blade leaves one side high. Sight down the sole and tweak the lateral lever. Even cuts follow. Finally, pushing too hard chatters the plane. Light pressure wins. Let the sharp edge do the work.
Pro tips take you further. Camber the blade slightly for tight joints. Hone a tiny curve in the center. It avoids ridges on wide edges. Use a shooting board for dead-straight results. Clamp your work at 90 degrees. Plane against a stop for perfection. Pair the plane with a card scraper after. It burnishes edges to glass smooth, no sanding needed. After sessions, wipe the sole clean. Add light oil to iron parts. Rust stays away, and adjustments stay smooth.
These steps build confidence. You dodge frustration and finish faster.
Fixing Tearout and Chatter Fast
Tearout and chatter kill smooth edges. They stem from simple issues. Wood prep matters first. Plane against the grain? Grain rips out. Check direction with light. Plane downhill always. Prep rough stock with a coarse pass. Softer woods like pine forgive more. Hard maple needs care.
Blade sharpness cures most tearout. Dull edges crush fibers. Hone fresh before tricky woods. Test on scrap. Continuous curls mean ready.
Settings tweaks fix chatter too. Back off the depth knob. Paper-thin shavings prevent vibration. Tighten the lever cap firm. Loose ones bounce. Close the mouth snug. It supports wood right at the cut. Misalignment adds chatter. Re-check lateral lever often.
Here’s a quick troubleshoot table for both:
| Issue | Cause | Quick Fix |
|---|---|---|
| Tearout | Dull blade, open mouth | Sharpen; close to 1/16 inch |
| Chatter | Too much depth, forcing | Retract blade; light pressure |
For example, on cherry end grain, skew 45 degrees. Tearout drops. Wood prep includes flattening first. Uneven stock chatters more.
Still stuck? These tweaks work every time. Your edges shine smooth.
 *Rough tearout left; smooth plane finish right.*FAQ: Quick Answers
Q: Chatter on straight edges?
A: Loosen pressure. Check sole flatness too.
Q: Tearout in figured wood?
A: Sharpen more. Or slice across grain lightly.
These keep your block plane reliable. Flawless finishes follow.
Long-Term Care to Keep Your Plane Performing
Your block plane delivers smooth edges now. Keep it that way with basic care. After each session, clean it quick. As a result, rust stays away, and adjustments stay smooth. Treat it right, and it lasts generations. You save money and hassle over time.
Start simple. Brush shavings from the mouth and blade right after use. They pack in and dull the edge fast. Wipe the sole and frog dry with a rag. Then, store it in a dry toolbox drawer. Avoid damp basements or garages.
Rust Prevention That Works
Metal parts rust easy in humid spots. Camellia oil stops that cold. Dab a thin coat on the blade back, lever cap, and sole. Buff it off so parts don’t stick. Apply after every few uses, especially in muggy weather. Dry storage helps too. Hang it or keep it upright.
In addition, skip WD-40; it gums up fine tweaks. Camellia oil penetrates without residue. Check woodworkers’ oil recommendations from Lie-Nielsen for top picks.
 *Plane after oil wipe-down, ready for storage.*Sharpening Schedule and Sole Checks
Hone the blade every two to three hours of heavy planing. Light use stretches to five hours. Burrs form fast on hardwoods. Test with arm hair; tug means sharpen now.
Check the sole yearly. Lay it on flat glass. Rocking means lap it flat again on 120-grit paper. Tight circles do the trick. A true sole cuts even every time.
Upgrades for Better Performance
Stock blades wear quick. Upgrade to A2 or PM-V11 steel. They hold edges longer. Add a toploader lever cap. It clamps tighter without slip. These cost little but boost results big.
When to Get a New One
Cracked body or sole that won’t flatten signals replacement time. Bent frogs or stripped screws count too. Quality planes like Stanley or Lie-Nielsen endure decades. Yours should too with care. Spot issues early, and it stays in service.
Conclusion
You started with rough, splintery edges on that picture frame or cabinet door. Now, proper setup and technique turn your block plane into a smoothing machine. Sharpen the blade razor-sharp first. Then align it straight, set the mouth tight, and use light push strokes with the grain. As a result, you get glass-smooth edges every time, no sanding needed.
Practice builds speed fast. Start small, like chamfering picture frame edges or fitting drawer fronts. These quick wins boost your confidence. In addition, handle end grain with skew cuts and climb passes. You dodge tearout and chatter right away.
Share your smooth results in the comments below. What project will you tackle next? Subscribe for more woodworking hacks, like our plane sharpening guide. Your block plane awaits. Transform those rough edges today!