Picture this. You plane a board for a perfect tenon. But your pencil marks vanished under sawdust. The cut drifts. Joint gaps appear. Sound familiar?
One woodworker faced this on a desk build. Fuzzy lines ruined three panels. He grabbed a marking gauge instead. Crisp scribes saved the day. No more guesswork.
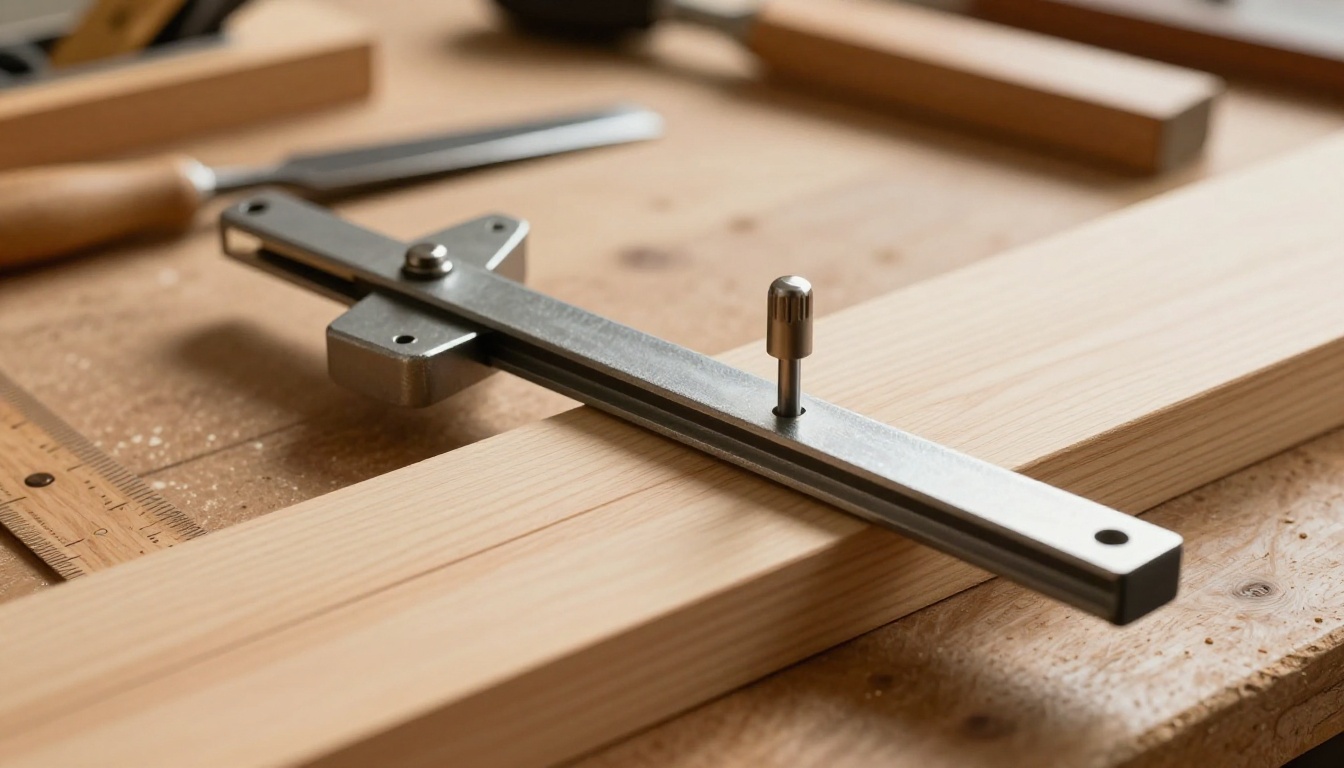
A marking gauge creates clean lines parallel to the wood edge. It has a long beam, sliding headstock with lock, and cutter like a pin or wheel. You set the distance. It scores exact layouts for joinery or shelves.
Pencils smear. Gauges don’t. Lines stay sharp through sawing and planing. You’ll nail dovetails, mortises, and dados every time.
This guide shows you how. Pick the right type. Set it up solid. Mark with control. Skip common pitfalls. Your projects turn pro-level fast.
Choose the Best Marking Gauge Type for Your Projects
Start here. The wrong gauge frustrates. The right one delivers precision. Three main types fit most shops: pin, wheel, and mortise.
Pin gauges use a metal rod. It digs into wood for traditional scribes. They work best on straight-grained lumber like oak or maple. Simple design keeps costs low, around $20. Beginners love them.
Wheel gauges, or cutters, roll instead of stab. They slice smooth paths. Great for figured woods or end grain. No tear-out. But they cost more, $40 and up.
Mortise gauges add a second pin. Mark both sides at once. Ideal for frames or tenons.
Pick based on your work. Softwoods? Go pin. Exotics or curves? Wheel. Frame joinery? Mortise.
Look for quality. Sturdy brass head. Smooth hardwood or steel beam. Firm lock screw. Replaceable cutters last years.
Reputable brands shine. Veritas tools offer precise engineering. Starrett holds tight tolerances. Check beam straightness before buying.
In short, match the cutter to your stock. You’ll see cleaner lines right away.

Pin vs. Wheel: Match the Cutter to Your Wood
Pins control depth well. They follow the fence tight. Use them for shelf dados in pine. But interlocked grain tears. Fibers lift.
Wheels glide over problems. Roll across curly maple without chatter. Perfect for guitar necks or tabletops. They track straight on end grain too.
Test both. Scribe scrap. Pin suits budget jobs. Wheel handles tough stock. As a result, your choice cuts errors.
When to Grab a Mortise Gauge Instead
Dual pins register from the edge. Set them equal. Slide the head. Lock it. Now mark waste sides identical.
Use for mortise-and-tenon frames. Both faces match perfect. No measuring twice.
Pins space via an adjusting wheel. Fine-tune for 1/4-inch mortises. Practice on poplar first.
Set Your Marking Gauge for Measurements That Never Fail
Setup matters most. A loose head drifts. Dull cutter waves. Nail this first. Then layouts fly.
Measure from the cutter face. Not the head edge. Use a steel rule or digital caliper. Zero it out against the fence.
Lock the head firm. Turn the screw snug. No wiggle. Test on scrap wood.
Check squareness. Hold beam to the stock face. Pin should point true. Adjust if off.
Sharpen often. Pins need a diamond stone. Wheels take a strop.
Pro tip: Tape common settings on the beam. 1/4 inch. 3/8 inch. Saves time.
Follow these steps. Your gauge holds steady every project.
Lock in the Exact Distance Every Time
Grab a rule. Butt it to the wood edge. Slide head until cutter hits your mark. Say 5/16 inch.
Tighten the screw slow. Too hard strips threads. Test scribe a line. Measure it. Adjust as needed.
Repeat on scrap. Confirm before real stock. This habit prevents rework.
For precision, pair with calipers. They read exact. Gauge transfers it faithful.
Keep the Cutter Razor-Sharp for Crisp Lines
Dull pins chatter. Lines fuzz. Fix with light strokes on a fine stone. 1000 grit works.
Angle the pin 10 degrees. Stroke away from the point. Ten passes each side.
Wheels strop best. Leather loaded with compound. Roll back and forth. Shine returns.
Test sharpness. Scribe should pop fibers clean. No pressure needed. Hone weekly for best results.

Nail Accurate Layouts with These Foolproof Marking Moves
Ready to mark? Hold perpendicular. Light pressure. Full length in one pass.
Always use the edge as fence. It guides true. Mark with grain first. Less resistance.
For centering, flip the board. Scribe from opposite face. Lines meet exact.
Start 1/2 inch from ends. Avoid splits. Work to the end.
Curves need tilt. Straight panels get two passes, from each end.
Consistency wins. Slow beats fast. Practice builds speed.
You’ll love tight joints after this.
Check Fine Woodworking’s layout tips for more shop-tested ideas.
Pull or Push? The Right Way to Guide Your Gauge
Pull for pins. Control stays high. Thumb presses head. Fingers trail beam.
Push wheels. They roll forward smooth. Palm leads. Less slip.
Hand position locks it. Elbow in. Body follows the line.
Try both on pine. Pull shines on long runs. Push fits tight spots.
Handle Curves and Angles Without Losing Precision
Tilt into the curve. Pin pivots natural. Practice arcs on scrap plywood.
Corners? Rock the head. Keep fence contact.
For compound angles, mark baselines first. Gauge follows clean.
These moves keep lines fair. No wobbles.
Mark Both Sides for Layouts That Line Up Perfectly
Fence trick helps. Clamp a stop block. Gauge bumps it each time.
Parallel lines repeat easy. Great for leg rails.
Flip stock. Register opposite edge. Twin scribes center perfect.
Dodge These Sneaky Mistakes for Flawless Results
Errors sneak in. Loose locks drift lines. Dull cutters wave. Uneven pressure bows.
Fix slippage first. Tighten incremental. Test every setup.
Wrong reference? Measure cutter face always. Head fools new users.
Pressure too hard? Lines thicken. Light touch rules.
Before and after shows it. Fuzzy to crisp. Joints close tight.
Master these. Your work impresses.
Stop Lines from Wandering Off Course
Slippage causes most. Head shifts mid-stroke. Or dullness grabs uneven.
Firm grip fixes. Test scrap before stock. Lock double-check.
Grain direction pulls too. Mark down-grain when possible.
What to Do If Your Gauge Won’t Stay Put
Worn screws slip. Replace with brass sets. They bite better.
Lubricate threads light. Beeswax works. Tighten without galling.
Upgrade locks if cheap model fails. Quality holds for life.
See Lee Valley’s gauge maintenance guide for parts.

Grab your gauge now. Practice these steps on scrap. Tight joints wait.
Right type matches wood. Solid setup holds true. Smooth moves scribe clean. Dodged errors shine.
Share your top tip below. What project did gauges save? Hit subscribe for more shop hacks.
Nothing beats the snap of fitted joinery. Get marking.